When I first started out trying to script, everyone said “Have you looked at the Wiki?” Uggh I did! I hated it, it looked to be a jumble of words and phrases or it was my ADHD kicking in!!
So one day I took my time and decided to try and figure it out. The first thing I did was the “Hello Avatar!” Script and breaking that down.
I guess its like breaking down a sentence with the verbs and nouns and adjectives.
You have to determine what you want your script to do. Currently I’m working on a HUD to do some static poses for a cheerleading HUD. I don’t want pose balls so and I don’t want to open the animation and use “Play in world” option because I may sell these suckers if I perfect it.
Heres where I stand:
Saturday, April 28, 2007
Friday, April 27, 2007
Scripting, Oh my!!
Scripts are handy, they can make objects hop around or say things or give out items or even make YOUR avatar do actions.
I’m a Frankenscriptor i.e. I take bits and pieces of scripts and put them together… What I plan to do is take excerpts from the wiki to learn how to script, or at least get an idea of scripting... In what I call *Jacks speak* something very simple and low tech.
Starting off with the *Hello Avatar default script.*
Why am I doing this? To get a handle on something fairly important in Second Life that also might make SL a little more fun or frustrating.
First off we need to make a prim!
Click the ground and chose * Create * in the pie chart, you will have that handy wand as your curser so tap the ground and hopefully a box will appear on the ground.
Still in the Edit menu
Click the *More* button and then the *Contents* tab.
Click the *New Script* button and you will see what looks to be a note with lines on it.
If you right click that and choose *open* you will see the new default script.
default
{
state_entry()
{ llSay(0, "Hello, Avatar!");
} touch_start(integer total_number)
{ llSay(0, "Touched.");
}
}
Close out the edit menu and click the new prim with the default script and your box will *speak* to you.
Ahhh!! Well that was easy… let’s learn more about this tiny script.
If you notice a scripter tries their best to keep the scripts clean and easy to read.
So, in the above script you have...
an event.
Then a function.
And maybe another event.
Then another function.
(I have to get my scripts to show corectly on this web page)
Parts of a script: As I learn more I’m sure this list will grow!!
// used to comment about the script… like a little note for you to know what’s going on.
{ } these are brackets; they encase the codes that are in scripts.
ll this is a Function it’s the part of the script that *does something*
The ; is like a break in the code as if you were writing a sentence it would be a comma.
Per the wiki the default code above has 1 State, 2 Events and 2 Functions:
The *State* in a script is like the status that the script is in and only one state can be active or running at any one time per script. Examples of states would be a light being on or off or window that is open or closed.
The *Event* in a script starts the code to working. Like when you click the box the box will say *touched*.
The *Function* are the action part of the script. Like change color or say something.
A script will always have a Default state, if I’m guessing right:
default
{
state_entry () // this is where the script starts when the script first enters the SL world
}
llSay (0,”Hello, Avatar!”); // this part is function of the code to say Hello Avatar! on channel 0
touch_start (integer total_number) // another event this time when someone clicks or touches the prim
}
llSay(0, “Touched.”); // another function when the prim will say touched when clicked
}
} // code closing brackets
In the Event of the llSay you see (0, "Touched."); this is like the container of what the Event will do. In other words we are telling the prim to *Say* “Touched” on channel zero.
Thursday, April 26, 2007
Making Snapshots >:)
When I first started SL I didn’t care anything about pictures pfft who needed them? 10 whole Lindens to have a picture? Bah!! I mean really, how can you remember that cool person you met or the fun times? Besides adding them to your Profile and making that nifty picture viewer! (See Picture Viewer) Oh what fun we can have now!
Now what’s cool on this blog page, you can learn camera controls and making that funny Profile and of course the viewer.
“Now, just how do you take a picture Jacks?” you’d say. Well of course you want that perfect setting, then the perfect person to take of or with.
Using the Camera Controls is very handy or the key strokes of holding your left mouse button and the Alt key. Just to get that Photo centered.
You can use the top of your screen under File and scroll down to Take Snapshot or the key strokes of Ctrl-Shift-S. I find the keystrokes are very useful when you want to take that shot (say on a pose ball) and you want it at the perfect time.

Once you save the pic, you can open it in Paint and crop it just as you want. Then File Save As and rename the picture there.
Now to upload that shot, go back to the top of your menu screen in SL under File and Upload Image (L$10) or use the easy key strokes Crtl-U.

Find the snapshot on your hard drive and up load it. There will be a faint "Uploading..." in the middle of you screen and in a few minutes your photo will appear. Click Keep.
 Mine are saved in the Textures folder in the Inventory, so its good to name them as you go, so you can locate them. I then slide it up in the Photo Album Folder (where is should be) :D
You can pass these bad bois along to all your friends or the options above all for free. I think it’s a courtesy, if a pal gives you a snapshot some time you should give one to them in return---
 --- Unless it looks like this one......
TIP: For a nice midnight shot
Now what’s cool on this blog page, you can learn camera controls and making that funny Profile and of course the viewer.
“Now, just how do you take a picture Jacks?” you’d say. Well of course you want that perfect setting, then the perfect person to take of or with.
Using the Camera Controls is very handy or the key strokes of holding your left mouse button and the Alt key. Just to get that Photo centered.
You can use the top of your screen under File and scroll down to Take Snapshot or the key strokes of Ctrl-Shift-S. I find the keystrokes are very useful when you want to take that shot (say on a pose ball) and you want it at the perfect time.

Then a box will pop up. I always save my snapshots to the hard drive so I can play with them in Photo Shop or super quick in Paint.
On the Image size (I use Current Window for the very reason why I use my Paint program to crop what I want. )
Capture In Colors
Show interface in the snapshot (gives you the whole SL screen with menu bar and everything on your screen-- Like my Camera Controls)
Show HUD objects in snapshot (is just what it says. If you have a HUD on your screen then its in the picture too)
Keep open after saving <~~ I never use it
Keep specified aspect ratio <~~ I never use it
Freeze frame (Full screen preview) <~~ I never use it
The New Snapshot (is like a retake umm someone blinked)
Auto snapshot (when you open or do the key strokes you will see a picture below)
Save button (will Save that picture --duh)
Discard button (chunks it-- double duh)
Once you save the pic, you can open it in Paint and crop it just as you want. Then File Save As and rename the picture there.
Now to upload that shot, go back to the top of your menu screen in SL under File and Upload Image (L$10) or use the easy key strokes Crtl-U.
Find the snapshot on your hard drive and up load it. There will be a faint "Uploading..." in the middle of you screen and in a few minutes your photo will appear. Click Keep.
Mine are saved in the Textures folder in the Inventory, so its good to name them as you go, so you can locate them. I then slide it up in the Photo Album Folder (where is should be) :DYou can pass these bad bois along to all your friends or the options above all for free. I think it’s a courtesy, if a pal gives you a snapshot some time you should give one to them in return---
--- Unless it looks like this one......TIP: For a nice midnight shot
Crtl P and then Graphics Details
Lighting Details: Check Nearby Local Lights
Do a crtl ~ to take super quick shots
Wednesday, April 25, 2007
Camera controls Not just for snooping anymore!
I like my camera controls, when I first started SL and someone said use your camera controls I thought why the heck? I’m not going to take any pictures I will never need that. Ok, I was so wrong on both counts, I am a picture freak and a Camera Control guru.
There are two ways to access your Camera Controls one is to use your Alt Key and use your left mouse button and swirl around. That does a Zoom in or out and if you continue to hold you mouse button and click the Crtl button the you get the orbit views ( I don’t mean you get orbited, you just float around objects).

The second way is to Click your main menu bar at the top of the screen under View and then Scroll down and Camera Controls. If you do that you get a handy box. The right wheel moves your site of view left or right and up and down. The Left wheel umm swirls you around (for the lack of a better word) Left and right and up and down. These are super Handy as you build or other things……there is a zoom in as well.
I’m hyper and get bored very quickly and distracted fast…..”Oh a hot-tie at 9 o’clock!” How to see this cutie up close?….Ok this is border line stalking but you can use this for other things.
Open up those View controls and Swirl and slide over to your “target”

and see what develops… orrr not :D

You can use this for locked buildings you “Just have to” see in……
Or great Photo Ops with the love of your life :D

So if you see me in Help Island Public just standing around… I’m prolly using my Camera Controls checking things out…..Give me a wave :D
There are two ways to access your Camera Controls one is to use your Alt Key and use your left mouse button and swirl around. That does a Zoom in or out and if you continue to hold you mouse button and click the Crtl button the you get the orbit views ( I don’t mean you get orbited, you just float around objects).
The second way is to Click your main menu bar at the top of the screen under View and then Scroll down and Camera Controls. If you do that you get a handy box. The right wheel moves your site of view left or right and up and down. The Left wheel umm swirls you around (for the lack of a better word) Left and right and up and down. These are super Handy as you build or other things……there is a zoom in as well.
I’m hyper and get bored very quickly and distracted fast…..”Oh a hot-tie at 9 o’clock!” How to see this cutie up close?….Ok this is border line stalking but you can use this for other things.
Open up those View controls and Swirl and slide over to your “target”
and see what develops… orrr not :D
You can use this for locked buildings you “Just have to” see in……
Or great Photo Ops with the love of your life :D
So if you see me in Help Island Public just standing around… I’m prolly using my Camera Controls checking things out…..Give me a wave :D
Monday, April 23, 2007
Put yer Shoe on Foo!
Have you ever got a new pair of shoes and they attached like this? (ladies don’t check out the sexy legs please).

I made some bikers boots just for funizies the other day and slapped them bad boys on and got that effect. Some how it doesn’t look very appealing. What to do? Well, there is always the Edit tool Box and of course that’s what we are going to use! :D
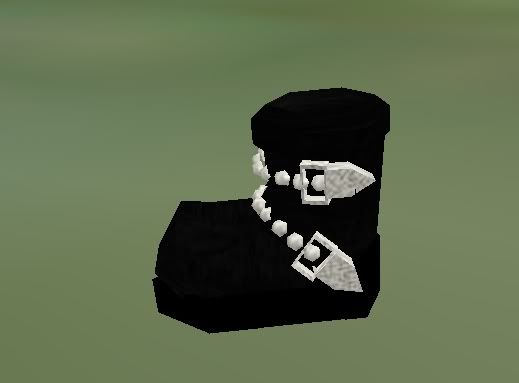
So you right click that mean old; shoe, boot, necklace, ring, bracelet what ever it is that you want to fit on your AV. The Edit Tool box Appears for you.
First we want to check the Rotate Option on the Edit Box and you see that handy wheel, I used the red one and rolled the boot to the proper position. I just click the red wheel and pulled down while still holding on the the wheel.

But what ho! It doesn’t seem to still be on my foot correctly, I think it needs to be pulled out of the ground a bit. So this time, check the Position option on the Edit box and you get arrows, so click on the blue one and it will pull your shoe up.
Some times you have to stretch your objects -- I have a hefty size AV. If you check the Stretch option in the Edit Box you can make it bigger. Just grab the little white boxes and pull or push to the desired size

It’s a good idea to make copies of what ever you are editing. If you cant do that, then just to get used to working with the Edit Options why not Rezz a box on the ground and attach that to your foot (hey you might start a new trend).Then play around with those Edit Options just so you get the power of each one.
I made some bikers boots just for funizies the other day and slapped them bad boys on and got that effect. Some how it doesn’t look very appealing. What to do? Well, there is always the Edit tool Box and of course that’s what we are going to use! :D
So you right click that mean old; shoe, boot, necklace, ring, bracelet what ever it is that you want to fit on your AV. The Edit Tool box Appears for you.
First we want to check the Rotate Option on the Edit Box and you see that handy wheel, I used the red one and rolled the boot to the proper position. I just click the red wheel and pulled down while still holding on the the wheel.
But what ho! It doesn’t seem to still be on my foot correctly, I think it needs to be pulled out of the ground a bit. So this time, check the Position option on the Edit box and you get arrows, so click on the blue one and it will pull your shoe up.
Some times you have to stretch your objects -- I have a hefty size AV. If you check the Stretch option in the Edit Box you can make it bigger. Just grab the little white boxes and pull or push to the desired size
It’s a good idea to make copies of what ever you are editing. If you cant do that, then just to get used to working with the Edit Options why not Rezz a box on the ground and attach that to your foot (hey you might start a new trend).Then play around with those Edit Options just so you get the power of each one.
Sunday, April 22, 2007
Making a chair
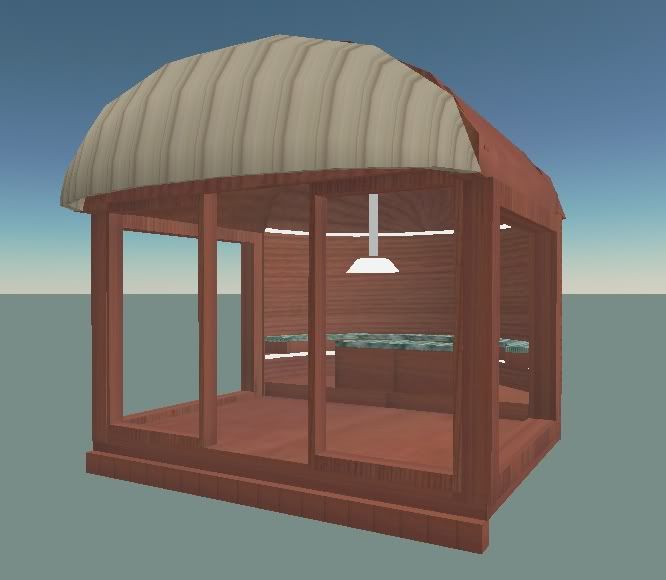
Making a couch/chair with sculpties.
No, we arenting going to break out Blender and slap out a couch but we are going to be using some freebie sculpt shape maps and attempt to make a couch. Then later we are going to add the MLVP poseball menu to the chair and build from that.
First off we probably need to thank Cel Edmand for providing us with a ton of sculpt maps that are free. You can usually search freebies and find them most any where. Torley Linden for shades textures, stop off in his sim and grab his textures.
We want the smooth cube sculpt texture, this will be our cushions for the back and seat and arms of the couch.
Also we need a
Saturday, April 21, 2007
SL Mini Storage
If you are like me, then I pity you. :D
I like to *pretend* that I can build furniture, some times I make a whole set of living room or bed room items or old costumes or poses and really don’t want to have that cluttering up my inventory.
No, really if you are like me then you have a lot of items that you don’t use on a regular basis and it takes forever to do a search because of all the unused items in your inventory.
What to do?
How about and Second Life Mini Storage?
Just Rezz a box on the ground
Edit
More tab
Contents Tab
Slide over what inventory you might want to put in the box
On the main tab of the newly rezzed box -- name it what ever you want ex: *Kitchen Items* *Old Jeans* *Halloween Costumes* what ever you want to box up and put away.
[pic]
Then you can texture the outside if you want or leave it in the wood texture.
[pic]
An added idea is to put floating text script in the Contents of the box as well. This will give you a white colored text floating above the box to identify what’s inside.
[script]
Now in your inventory make a new folder and call it *Mini Storage* or whatever you want. Your Inventory, Your Name. :D
Friday, April 20, 2007
Profiles or How to make someone laugh
Profiles are fun and can be very addictive.
I have a bad habit of reading everyone’s profiles as they come near me. To read a persons profile just right click their AV and select "Profile". Some show dedications of love, for example, search my brother, MarkJ Munro and read his.
Some are about themselves and interests in or out of SL, maybe to get a virtual job or to show talents. A lot show their favorite places and what they like to do while they are there. Try to look at the whole profile clicking on each tab, there is no telling what you my find!
In this I’m going to show you how to make your own profile so you can be as serious or silly or love sick in it as you want.
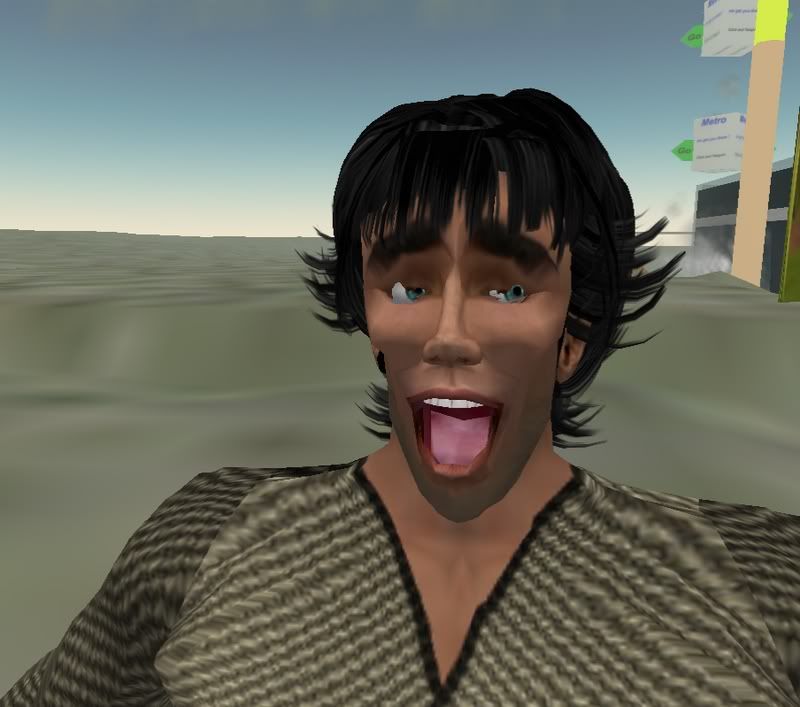
This is my profile. Nice face hey?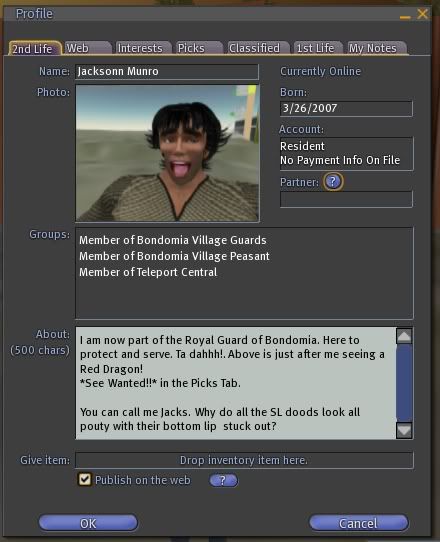
You can get to your profile 2 ways that I know of. One is to click your self a pie chart comes up then Profile or the top of the Menu screen Click Edit then scroll down to Profile; this dandy little box pops up with neat little tabs to look at. You can fill the tabs in or leave them blank, “your profile, your imagination.” :D

And just below that is a larger area, this has the original description of the Pick, like shoes or clothing or free umm toys. Once again, delete that text out and put what ever you want to in there
After you are done click the OK tab at the bottom to save your handy work.
I have a bad habit of reading everyone’s profiles as they come near me. To read a persons profile just right click their AV and select "Profile". Some show dedications of love, for example, search my brother, MarkJ Munro and read his.
Some are about themselves and interests in or out of SL, maybe to get a virtual job or to show talents. A lot show their favorite places and what they like to do while they are there. Try to look at the whole profile clicking on each tab, there is no telling what you my find!
In this I’m going to show you how to make your own profile so you can be as serious or silly or love sick in it as you want.
This is my profile. Nice face hey?
You can get to your profile 2 ways that I know of. One is to click your self a pie chart comes up then Profile or the top of the Menu screen Click Edit then scroll down to Profile; this dandy little box pops up with neat little tabs to look at. You can fill the tabs in or leave them blank, “your profile, your imagination.” :D
Here are the other Tabs on Profiles:
2nd Life Tab: is everything about SL: AV name, your SL birthday, Picture of your AV if you wish.
Partners are like SL marriages, just shows other AVs you are hooked up and hands off. (Got Partner?)
Groups-- Well groups are umm Groups that you joined, those cool little tags that appear on the top of your AV name. -- I made one called "Scramblers Untie".
About Tab: Can be used to talk about yourself or some RPG people use it to describe their characters roll on SL, some profess their love for another AV. Just depends on you and your mood. (One guy had, “I like to blow things up, and if you don’t get me it’s your loss”)
Web Tab: You can put your very own Web page link there! (I put this one.)
Interests Tab: Is once again SL related they can help you get that virtual job if you use it properly. (I'm in between jobs) *wink*
Classifieds Tab: Umm not sure, I think that’s for like store owners.
Picks Tab: That would be the places in SL you think might be cool for others to visit. Say you are TPed to a spot and want to share that with others that might be a profile reader, like me. Just click the New button on top and WABAM!! You have your first Pick. You can delete it as well, just click the little name on the left side and click the Delete button. UNWABAM!! It’s gone.
1st Life Tab: is supposed to be your Real Life info. You don’t have to fill that out. I think I put something goofy in mine. (Usually I put up some drawing I uploaded.)
My Notes Tab: Well, I don’t use that on me, but I do use it about my friends, it helps me remember information they gave me. Like where we met, their favorite color, etc. (This one girl I met on here, my only note is "WHACK A DOO"). <~~ I see her, I umm... TP away :D
Ok that’s all the Tabs, I like to mess around with the Picks and of course 2nd Life Tab most of all.
On the Picks Tab you can change that around. I really messed mine up. I clicked one of my Pick Names and added my own picture. To do that,
Double Click on the orginal picture and your Texture and Photo Album in the Inventory will pop up. It’s sort of like adding a texture to a prim.
Find your picture you want in there and Select it or slide it on your profile.

And just below that is a larger area, this has the original description of the Pick, like shoes or clothing or free umm toys. Once again, delete that text out and put what ever you want to in there
After you are done click the OK tab at the bottom to save your handy work.
Thursday, April 19, 2007
Clean up that Inventory!
We all know how our closets in the real world can get unorganized and messy, so can SLs inventory. This is a sort of a tip blog of how I am organizing my inventory list. (It’s a constant task) When I first started SL I grabbed EVERY freebie there was out there; houses, cars, clothes (guys& girls), weapons, jewelry, anything. Ok, that was fun at first but trying to find something was insane, I couldn’t find it if I had to. My friends, “Hey Jacks, lets go to the beach” me, “Ok, let me find my swim stuff” tick tock, tick tock. They would tap their virtual foot and check their virtual watches. 10 minutes later I was set to go, I hated it, organization can be your friend on here.
If you think of your Inventory List as the same as the file folders in your C: Drive of your computer that will help, you can; sort, rename and list those folders however you need. So with my new AV I deleted all the default things in the list (I kept one shape and clothes until I bought some).
If you think of your Inventory List as the same as the file folders in your C: Drive of your computer that will help, you can; sort, rename and list those folders however you need. So with my new AV I deleted all the default things in the list (I kept one shape and clothes until I bought some).
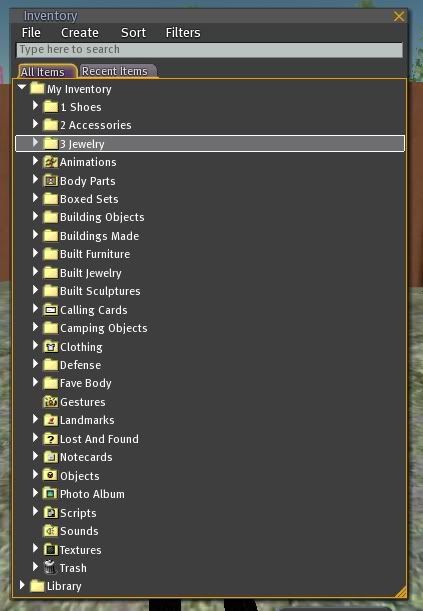 As you can see I added folders, just like on your computer you can add folders, just click the Create on the top of Inventory Menu and you will see Folder. The new folder is added and of course called "New Folder"; you can right click that and choose Rename and slide that in the Inventory where you require it.
I made categories of mine, and numbered them so they sort like I want. Example: 1 Jewelry, 2 Accessories, 3 Shoes, 4 Hair and so on, if you put a number in the name they go to the top of the list. I use the default clothing Folder to put, of course, my clothes in, but inside I added subfolders and renamed them. Like "Suits" (for those shirt pant combos), "Costumes" (fun times), "Shirts" (single shirts) "Jeans" (single pants). I can even embarrassingly say that within the shirt folder I have; "T-shirts", "Dress Shirts/w ties", "Sweaters". (I won’t tell you that T-shirts are broken down by color) Opps I did :D.  You don’t have to organize only with clothing, I like to build so I made a; "Built Furniture", "Built Buildings", "Built Sculptures", etc. I kept the “Built” part on all of them as a clue and to keep them together when I sort my inventory.
Landmarks, now you know you have a billion of those. If you made subfolders like; "Shopping", "Interesting", "Sandboxes", "Friends Homes", and "Clubs", whatever you need to get you there fast. (minus a friendly TP).
Now for the handy part of all this --- quick changes!! I like the RPG sims, mostly medieval, so I have some clothing just for that.
The Scene:
I’m off in a sandbox in *street clothes* and I get an IM “Come to blah blah, we need your help, there is a Dragon attack!!” Ahhh!! Umm Uhhh let me look and umm ahh change!
Solution! Take the folder you know your “Knight in Shining Armor” is in and pull it on top of your AV. WABAM!! All the items in that folder have now magically attached to your AV.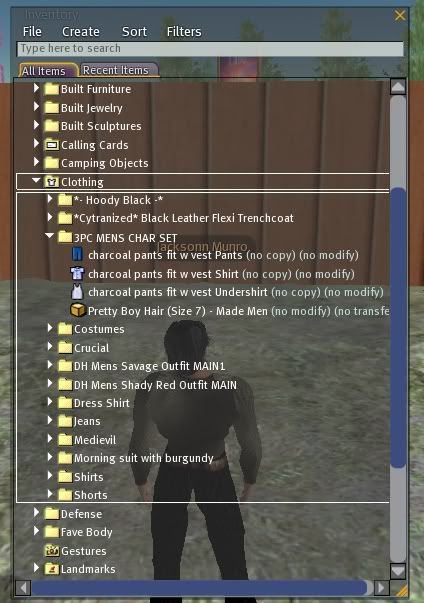 You have changed but uhh oh, if you are like me, you have no hair on so you have to find your hair and reattach it.
My solution to this, --I know this isn’t beneficial to you ladies with bluejillion types of hair -- but I only have one style, so I copied it in each clothing folder. So for you ladies, lets say in your clothing folder you had a “cute red dress” folder and in it you had the dress and the shoes and one certain hair that “just went perfect with that outfit” you could pull that on you and then instant change.
Again you can copy (The copiable) jewelry, shoes, tattoos, whips, chains, whatever, in each folder you want. Or you could hunt in your inventory for a few minutes while the Dragon eats all the peasants in the village. :D
TIP: After you have moved everything to its proper place. Click the top of the Inventory and File and Sort by name. Then take a scroll through your inventory and see if you have duplicates. Hey, thats one less item to look at orrrrrr a spot to fill later :D.
Wednesday, April 18, 2007
Building Tips
The Shift X This places what ever you Rezzed on the grid line up. Helpful if you want to line items up.  To copy items with the arrows. What ever you Rezz. If you select the Prim you will see Blue or Red or Green arrows. If you select (click on) one of the arrows and hold the shift key slide your mouse in the direction of the arrow --wabam! a duplicate Prim lined up with your original Prim.
 Got a little Copy Crazy!
Rotation Rotation is just about like the arrows on a selected object. You can grab the red, blue, green rings and postition any way you want. Also grabbing in the "White zone" of the wheel gives you free reign on the rotations.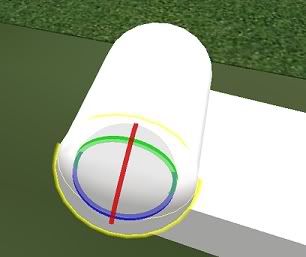 Use wheel to rotate your objects.
View Controls The view controls are located on the Top Menu Bar under View Tab (of course) these can be very handy while editing and making sure your objects are lined up properly. Try them they take practice to use.I keep this up all the time.
To copy items with the arrows. What ever you Rezz. If you select the Prim you will see Blue or Red or Green arrows. If you select (click on) one of the arrows and hold the shift key slide your mouse in the direction of the arrow --wabam! a duplicate Prim lined up with your original Prim.Got a little Copy Crazy!Rotation Rotation is just about like the arrows on a selected object. You can grab the red, blue, green rings and postition any way you want. Also grabbing in the "White zone" of the wheel gives you free reign on the rotations.
Use wheel to rotate your objects.View Controls The view controls are located on the Top Menu Bar under View Tab (of course) these can be very handy while editing and making sure your objects are lined up properly. Try them they take practice to use.
I keep this up all the time. To Link Prims.
Select thePrims to be link by using the Selection Tool in the Edit Menu box. Then drag your curser over all that you want to link. This places a faint yellow box around all the Prims and also highlights them.
Monday, April 16, 2007
Sculptures In Second Life
They say scultping will be easier in Second Life with some handy new building tools. I can't wait to get my hands on them. I like to tinker around with the shapes and see what I might come up with so far its been this:
 If you can't tell what it is then its an Ape "Grape Ape" and if you look in his hand you see me and my brother Mark sitting there. I use this guy to build with, umm not Mark, the ape. I dont get any pushes or shoves when he's around.
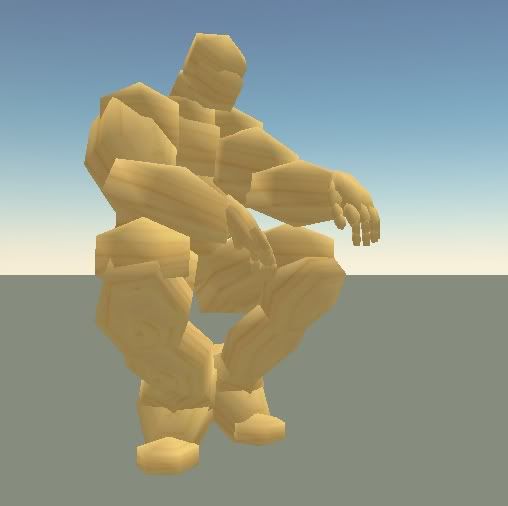
I call this "A Long Day." Its supposed to be a man squatting down. I was thinking of putting a baby below him but right now its like this. I recently textured this with a blue marble. It looks ok.
If you can't tell what it is then its an Ape "Grape Ape" and if you look in his hand you see me and my brother Mark sitting there. I use this guy to build with, umm not Mark, the ape. I dont get any pushes or shoves when he's around.I call this "A Long Day." Its supposed to be a man squatting down. I was thinking of putting a baby below him but right now its like this. I recently textured this with a blue marble. It looks ok.
 I call this "Hold Tight." If you can make it out, its a hand with a baby hand holding on to the index finger. As I said, I'm not very good at this. I guess art really is in the eye of the beholder.
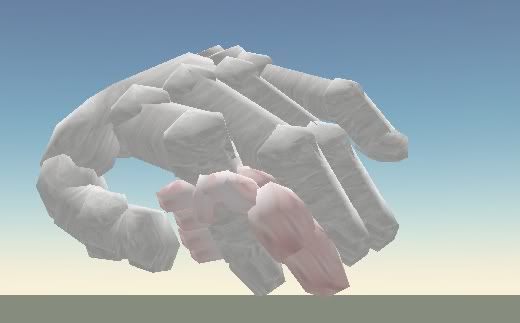
Now another: This is called "Making the Panama Canal." I saw a picture or documentary on this and it stuck in my head, so to get it out I either draw or make it. This poor guy is in need of some food!

Saturday, April 14, 2007
Some sample buildings

Friday, April 13, 2007
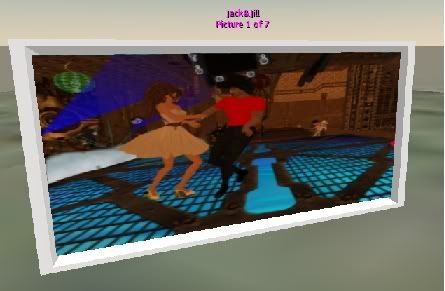
Picture Viewer
Super easy item to make is a Picture Viewer.
Then click the "Save" button at the bottom of the note box and wait for the script to compile.
<~ Me! at New Years
A Picture Viewer is like an online photo album of all your SL photos or movies if you prefer.
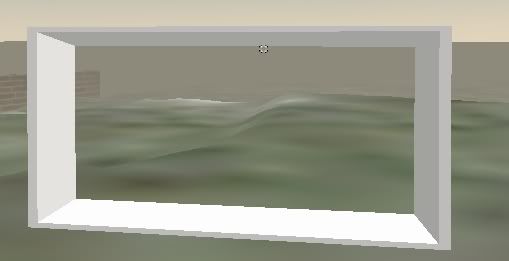
First Rezzed a Cube as this:
X 2.093
Y 4.300
Z .600
Measurements and hollowed it out to 95% this was our frame.
With a Rotation of Y: 270
<~~ Frame!
Stretch it because I wanted the big super plasma TV look going on. Then changed the taper
X .15
Y .10
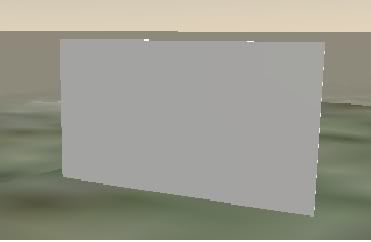
Then Rezzed another Cube
X 0.071
Y 3.772
Z 1.758
and fit that to the back of the frame with that as if it were the canvas.
The texture on this has to be set to all ones, if not then you get multipule pictures on the canvas. (kinda like how a Fly sees things)
Horizontal (U) .140
Veritcal (V) 7.900
Repeats per Meter 2
<~~ Canvas!......boy am I excited?
This Prim (canvas) is where I put the script in that holds the pictures.
Select the canvas Prim and in the More button on the Edit box go to Content Tab and add this script.
(Pre prep) First you need to make the script note card. One of two ways, Click the "Add script" in the Contents Tab or Go to your Inventory and at the top menu is a "Create" Tab. Click that and "New Script". A small note box will appear with a script already in there. Delete that script that loads inside and copy and paste this one:
key ownerkey;
string tvname = "JacksTV";
integer numberitems = 0;
integer selected = 1;
integer storelisten = 0;
float r=1.0;
float g=1.0;
float b=1.0;
integer switchtime = 15;
updatetext()
{
if(r==-1)
llSetText("",<0,0,0>,100);
else
llSetText(llGetInventoryName(INVENTORY_TEXTURE,( selected - 1))+
"\nPicture "+(string)selected+" of "+(string)numberitems, <r,g,b>, 1.5);
llSetTexture(llGetInventoryName(INVENTORY_TEXTURE, (selected - 1)),ALL_SIDES);
}
Init()
{
ownerkey = llGetOwner();
llInstantMessage(ownerkey,"JacksTV script reset!");
numberitems = llGetInventoryNumber(INVENTORY_TEXTURE);
updatetext();
llListenRemove(storelisten);
storelisten = llListen(0,"",ownerkey,"");
}
switchpic()
{
selected++;
if (selected > numberitems)
selected = selected - numberitems;
updatetext();
}
default
{
state_entry()
{
Init();
llSetTimerEvent(switchtime);
}
on_rez(integer param)
{
Init();
llSetTimerEvent(switchtime);
}
listen(integer channel, string name, key id, string msg)
{
list command = llParseString2List(msg,[":"],[]);
if(llList2String(command,0)==tvname)
// ALL COMMANDS MUST START WITH THE TVNAME
{
string whichcommand=llList2String(command,1);
if(whichcommand=="setname")
{
string newname=llList2String(command,2);
if(newname!="")
{
llSay(0,"JacksTV '"+tvname+"' has been renamed: '"+newname+"'.");
tvname=newname;
}
else
{
llSay(0,"Sorry, you must enter a name for your vendor. Please try again.");
}
}
else if(whichcommand == "setcolor")
{
list colors = llParseString2List(llList2String(command,2),[","],[]);
r = (float)(llList2String(colors,0));
if(r != -1)
{
r = r / 255;
}
g = ((float)(llList2String(colors,1))/255);
b = ((float)(llList2String(colors,2))/255);
updatetext();
}
else if(whichcommand == "settimer")
{
switchtime = (integer)llList2String(command,2);
llInstantMessage(ownerkey,"JacksTV will now switch every "+(string)switchtime+" seconds.");
llSetTimerEvent(switchtime);
}
else if(whichcommand == "reset")
{
llResetScript();
}
}
else
if(llList2String(command,0)=="GetJacksTVName")
{
llSay(0,"My name is: "+tvname);
}
} // end listen
touch( integer n)
{
// llSay(0,"changing");
switchpic();
}
timer()
{
switchpic();
}
}
Then click the "Save" button at the bottom of the note box and wait for the script to compile.
When you see "Compile Successful"! Close the note and rename it something you will recognize (TV Viewer).
Slide that note from your inventory into the "Contents" Tab of the back portion of the Canvas Prim. That is if you chose to open a script in your inventory, other wise its already in you Contents Tab.
Then do the same with those really cool pictures people send you in SL. You slide those over into the contents Tab along with the new script you copied and pasted. (Canvas prim)
I did the select all trick and linked the 2 Prims together (Frame and Canvas).
Close the Edit box out and click the viewer to activate it and enjoy the show.
Later, I chose a mahogany texture to it just to give it an elegant look I did a few in metallic as well.
Handy tip: Before you add the pictures to the viewer -- rename them. Say, if you have a picture of you and your best mate. Rename them like “Me and Jimmy Jo Bob” or whatever, this way whoever watches the slide show will know who they are viewing or what the object it is.
Handy tip: Before you add the pictures to the viewer -- rename them. Say, if you have a picture of you and your best mate. Rename them like “Me and Jimmy Jo Bob” or whatever, this way whoever watches the slide show will know who they are viewing or what the object it is.
Thursday, April 12, 2007
First Build
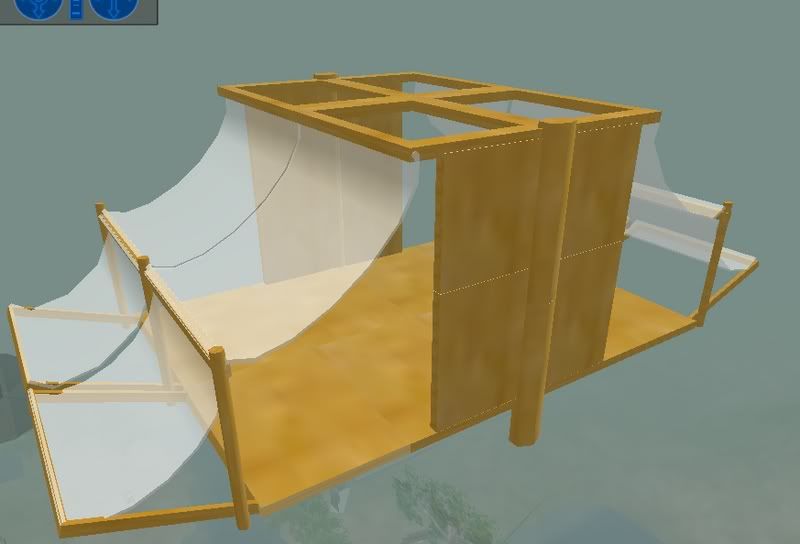
So yesterday in the sand box at Help Island, I made my first piece of furniture; a couch - white.
X 2.444


Note: I do not claim to be a builder of any magnitude and have had no formal training. Just tinkering around with the Prims (primitives). As you can see.
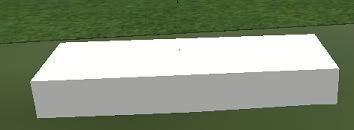
The first prim I made was a square and stretched it into a long rectangle (seat)
<~~ Doesnt come out naturally white.
Open up the "More" tab in the edit box and use these numbers.
X 2.336
Y 0.911
Z 0.500
then a tube (arm)
X 0.656
Y 0.710
Z 0.902
and one oval 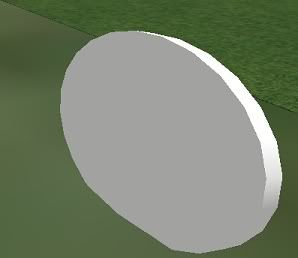 (back)
(back)X 2.444
Y 1.507
Z 0.165
and half moon (arm cap)
X 0.663
Y 0.716
Z 0.496
and a ball (foot)
X 0.303
Y 0.367
Z 0.295
When you right click the ground in a sand box the "Create" option a pie chart appears. This brings up an editor box. I would suggest at Help Island to read the tutorials there about creating Prims.
First thing I did was take the seat and stretch it.
Next the oval (back rest) I made that the same length as the seat and thinned it out.
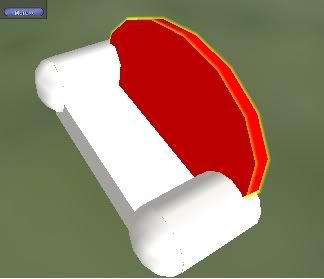 <~ Back in red so you can see it
The tube (arms) I stretched to the width of the base and width.
The half moon (arm caps)were stretched and rotated to stand on end to one meter wide.
First I grabbed the oval and placed it on the back of the rectangle and then put a slight rotation on it trying to center the edges and dropping it into the rectangle slightly.

Then I grabbed the tube (arms) and positioned it on one end of the rectangle letting half of it hang off. I copied the tube (using the Select shift trick) and placed it on the other side of the rectangle and positioned it also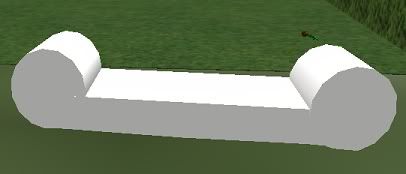
<~ Base with two tubes attached
Arm caps were next placing them on the ends of the tubes by rotating them to cap them off.
<~ see rotation wheel? (see building tips)
I played around with the rotation/position of the items until I had them like I wanted and it looked semi like a sofa.
Then clicked the edit tool and above it all and created a yellow box around the whole thing. Holding the Ctrl key and L then letting go of the L key. In doing this, I linked all the Prims as one making it one solid object to work with. 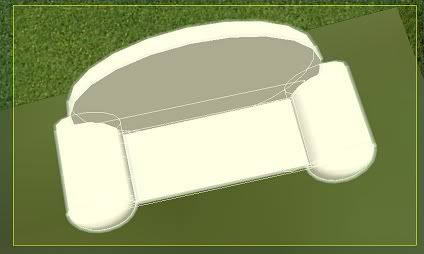
<~~~ See the faint yellow box?
You can only have 256 Prims to link.
Now I could rotate the couch to insert the balls on the bottom as feet.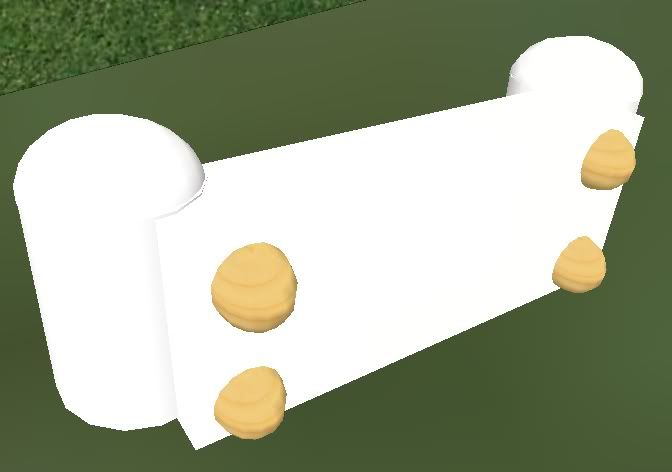
I worked our Ctrl L key trick once more and linked all the items again. After, I changed the texture to solid and the color to white and admired my first attempt to making furniture. It was simple and very primitive, I am sure there are easier and more proficient ways to make this but I wanted to try.
Subscribe to:
Comments (Atom)