Thursday, September 27, 2007

Slim Tank Part 3

Ok Part 3 of the Slim Tank! This is the part where we are adding rocks and fish and plants. Wooo hoo!! :D

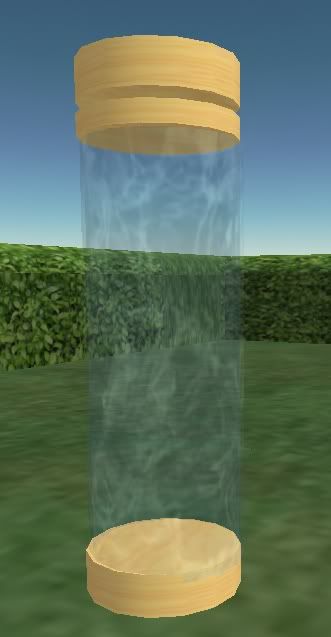
First off the fish portion of the aquarium is a trick with an emitter. Emitters are well they *emit* or give something out. In this case the will be giving out little fishy textures. :D but! It could be leaves or ghosts or bats orrrrrrr butterflies orrrr your favorite picture! What ever your hearts desire ohhh hearts :D.

The deal with them is you have to have a script that will *push out* the image you want. There for you have to have that texture to *push out* or emit. Both of those items go into the Contents Tab of our prim we are about to make. In my travels on Second Life I found some fish textures and have mentioned numerous times about Harbingers Haven texture vendor. I snagged a copy of a fish and that’s what I am using here. You can also search the web for the texture you want and upload them and use those.

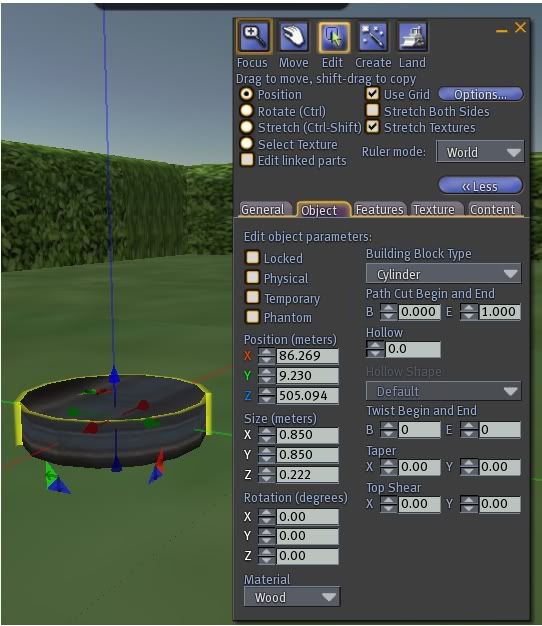
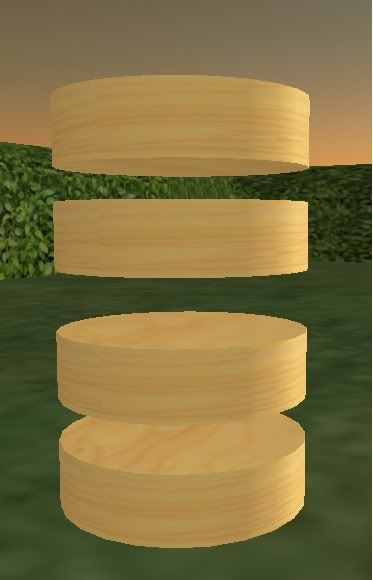
To make our emitter; I used the copy with arrows trick on disk 1 (the base) of the aquarium.
You know, select the base prim and Shift and Click on the blue arrow and move your mouse up to make a duplicate of the prim, to keep it all lined up with the tank and then sized it like this:
Size (meters)
X
Y
Z


Then I clicked on the contents tab and dropped my script (below) and texture in.


// SECTION ONE: APPEARANCE -- These settings affect how each particle LOOKS.
integer glow = TRUE; // TRUE or FALSE(*)
vector startColor = <1,1,1>; // RGB color, black<0,0,0> to white<1,1,1>(*)
vector endColor = <1,1,1>; //
float startAlpha = 1.0; // 0.0 to 1.0(*), lower = more transparent
float endAlpha = 1.0; //
vector startSize = <0.2,0.2,0>; // <0.04,0.04,0>(min) to <10,10,0>(max>, <1,1,0>(*)
vector endSize = <0.1,0.1,0>; // (Z part of vector is discarded)
string texture = "Fish Emitter 8"; // Texture used for particles. Texture must be in prim's inventory.

// SECTION TWO: FLOW -- These settings affect how Many, how Quickly, and for how Long particles are created.
// Note,
integer count = 2; // Number of particles created per burst, 1(*) to 4096
float rate = 0.5; // Delay between bursts of new particles, 0.0 to 60, 0.1(*)
float age = 5; // How long each particle lives, 0.1 to 60, 10.0(*)
float life = 0.0; // When to stop creating new particles. never stops if 0.0(*)

// SECTION THREE: PLACEMENT -- Where are new particles created, and what direction are they facing?
float radius = .30; // 0.0(default) to 64? Distance from Emitter where new particles are created.
float innerAngle = PI; // "spread", for all ANGLE patterns, 0(default) to PI
float outerAngle = 0.0; // "tilt", for ANGLE patterns, 0(default) to TWO_PI, can use PI_BY_TWO or PI as well.
integer pattern = PSYS_SRC_PATTERN_EXPLODE; // Choose one of the following:
// PSYS_SRC_PATTERN_EXPLODE (sends particles in all directions)
// PSYS_SRC_PATTERN_DROP (ignores minSpeed and maxSpeed. Don't bother with count>1 )
// PSYS_SRC_PATTERN_ANGLE_CONE (set innerangle/outerange to make rings/cones of particles)
// PSYS_SRC_PATTERN_ANGLE (set innerangle/outerangle to make flat fanshapes of particles)
vector omega = <0,0,0>; // How much to rotate the emitter around the axises. <0,0,0>(*)
// Warning, there's no way to RESET the emitter direction once you use Omega!!
// You must attach the script to a new prim to clear the effect of omega.

// SECTION FOUR: MOVEMENT -- How do the particles move once they're created?
integer followSource = FALSE; // TRUE or FALSE(*), Particles move as the emitter moves, (TRUE disables radius!)
integer followVel = FALSE; // TRUE or FALSE(*), Particles rotate towards their direction
integer wind = FALSE; // TRUE or FALSE(*), Particles get blown away by wind in the sim
integer bounce = FALSE; // TRUE or FALSE(*), Make particles bounce on Z altitude of emitter
float minSpeed = 0.1; // 0.01 to ? Min speed each particle is spit out at, 1.0(*)
float maxSpeed = 0.1; // 0.01 to ? Max speed each particle is spit out at, 1.0(*)
vector push = <0,0,-0.1>; // Continuous force pushed on particles, use small settings for long lived particles
key target = "self"; // Select a target for particles to arrive at when they die
// can be "self" (emitter), "owner" (you), "" or any prim/persons KEY.

// SECTION FIVE: Ama's "Create Short Particle Settings List"
integer enableoutput = TRUE; // If this is TRUE, clicking on your emitter prim will cause it to speak
// very terse "shorthand" version of your particle settings. You can cut'n'paste
// this abbreviated version into a call to llParticleSystem([ ]); in another script.
// Pros: Takes up far less scripting space, letting you focus on the rest of your code.
// Cons: makes tune your settings afterwards rather awkward

// === Don't muck about below this line unless you're comfortable with the LSL scripting language ====

// Script variables
integer pre = 2; //Adjust the precision of the generated list.
integer flags;
list sys;
integer type;
vector tempVector;
rotation tempRot;
string tempString;
integer i;

string float2String(float in)
{
return llGetSubString((string)in,0,pre - 7);
}

updateParticles()
{
flags = 0;
if (target == "owner") target = llGetOwner();
if (target == "self") target = llGetKey();
if (glow) flags = flags PSYS_PART_EMISSIVE_MASK;
if (bounce) flags = flags PSYS_PART_BOUNCE_MASK;
if (startColor != endColor) flags = flags PSYS_PART_INTERP_COLOR_MASK;
if (startSize != endSize) flags = flags PSYS_PART_INTERP_SCALE_MASK;
if (wind) flags = flags PSYS_PART_WIND_MASK;
if (followSource) flags = flags PSYS_PART_FOLLOW_SRC_MASK;
if (followVel) flags = flags PSYS_PART_FOLLOW_VELOCITY_MASK;
if (target != "") flags = flags PSYS_PART_TARGET_POS_MASK;
sys = [ PSYS_PART_MAX_AGE,age,
PSYS_PART_FLAGS,flags,
PSYS_PART_START_COLOR, startColor,
PSYS_PART_END_COLOR, endColor,
PSYS_PART_START_SCALE,startSize,
PSYS_PART_END_SCALE,endSize,
PSYS_SRC_PATTERN, pattern,
PSYS_SRC_BURST_RATE,rate,
PSYS_SRC_ACCEL, push,
PSYS_SRC_BURST_PART_COUNT,count,
PSYS_SRC_BURST_RADIUS,radius,
PSYS_SRC_BURST_SPEED_MIN,minSpeed,
PSYS_SRC_BURST_SPEED_MAX,maxSpeed,
PSYS_SRC_TARGET_KEY,target,
PSYS_SRC_INNERANGLE,innerAngle,
PSYS_SRC_OUTERANGLE,outerAngle,
PSYS_SRC_OMEGA, omega,
PSYS_SRC_MAX_AGE, life,
PSYS_SRC_TEXTURE, texture,
PSYS_PART_START_ALPHA, startAlpha,
PSYS_PART_END_ALPHA, endAlpha
];
float newrate = rate;
if (newrate == 0.0) newrate=.01;
if ( (age/rate)*count < onoff="0;" enableoutput ="=" i="1;i<42;i+=" type =" llGetListEntryType(sys,i);" type ="=" tempstring =" float2String(llList2Float(sys,i));" sys =" llDeleteSubList(sys,i,i);" sys =" llListInsertList(sys,[tempString],i);" type ="=" tempvector =" llList2Vector(sys,i);" tempstring = "<">";
sys = llDeleteSubList(sys,i,i);
sys = llListInsertList(sys,[tempString],i);
}
else if (type == TYPE_ROTATION)
{
tempRot = llList2Rot(sys,i);
tempString = "<" + float2String(tempRot.x) + "," + float2String(tempRot.y) + "," + float2String(tempRot.z) + "," + float2String(tempRot.s) + ">";
sys = llDeleteSubList(sys,i,i);
sys = llListInsertList(sys,[tempString],i);
}
else if (type == TYPE_STRING type == TYPE_KEY)
{
tempString = "\"" + llList2String(sys,i) + "\"";
sys = llDeleteSubList(sys,i,i);
sys = llListInsertList(sys,[tempString],i);
}
}
i = llListFindList(sys,[20,""]);
if (i != -1) sys = llDeleteSubList(sys,i,i+1);
llWhisper(0,"[" + llList2CSV(llList2List(sys,0,22)) + ",");
llWhisper(0,llList2CSV(llList2List(sys,23,-1)) + "]");
}
}
If you noticed I have one portion of the text in bold. That has to be the name of the texture you are using be it Hearts or Flowers and in this case Fish. :D
Save the script and let it compile, you should see what ever texture you have being pushed out.

Wednesday, September 26, 2007

Slim Tank Part 2

So yep, if you remember in the previous post Slim Tank and if you don’t you can to the post and check it out. We needed to add a few extras to the Slim Aquarium.

In disk 2, that’s the second one from the bottom or our glass part we needed to add a script to make the water umm more water like.

Click on disk 2 and Edit and then the More and then Contents Tab. There you want to Add New Script.

Open the script folder up and delete the “Hello Avatar!” Script that defaults there and add this one:

default
{
state_entry()
{
llSetTextureAnim(ANIM_ON SMOOTH LOOP, ALL_SIDES,0,0,0.0, 1,0.05);
}
}

This is the texture animator to make the water appear to be rolling around in the tank portion of the aquarium.

Save the script and let it compile. Wabam! Water swishing. :D

What about a annoying water sound? Do the same just click on new script and add this in.

(forgot script)


WABAM!! Water noises.


In Disk 3, that’s the third one from the bottom is our light. Every tank has to have a light, the fishes would go crazy and the plants would die. :D

Click on disk 3 and Edit and then the More button and then Contents Tab. Once again add a new script and delete the default one and add this one:

// Declare global fields.
//
integer gfLtOn; // Used to remember whether the light is on or off.
float gfLtIncr; // Used to hold the lighting increment to adjust with.
//============================================
// gmInitFields()
// gmInitFields()
{
//
// Set the default state of the lit object.
//
gfLtOn = TRUE;
//
// Set the increment to increase and decrease the lighting level.
// gfLtIncr = 0.01;
}
//
//
End of gmInitFields
//============================================
//============================================
// gmSetColor
// gmSetColor()
{
//------------------------
// Declare local variables
//
float l; // used for loop control and setting color vector v;
// used to hold a color value
//
// First, check to see if the object is already "lit" or not.
// if (gfLtOn)
{
//
// Yes, it is lit, so darken it. Do this within a loop.
//
// The loop below basically runs a color-setting loop where the
// the loop variable itself is used as the color increment. From
// what I can gather by seeing it work, color is held in a "vector"
// construct where the three values of the vector represent
// RED, GREEN, and BLUE values. The values apparently can range from
// 0.0 to 1.0 (they are floating point values--as vectors always
// are).
//
// Since this is the area where we darken the light source, I use
// the loop to decrement it's value from 1.0 to 0.0 in steps. The
// size of the step is defined in the field gfLtIncr.
// for (l = 1.0; l >= 0.0; l = l - gfLtIncr)
{
//
// Now that the value of l has been set, we need to assign
// that color to all the fields of the color vector v. To
// do that, we use direct assignments.
//
// In order to keep the color cycling of the object very
// non-colorful (since it is supposed to be a light source, // after all), we will adjust all three fields of the vector
// to the same value.
//
v.x = l; // Assign the color value l to the x field of v
v.y = l; // Same, but to y
v.z = l; // "
//
// Now that the color vector is set, assign that vector as the
// color of the object. Instruct the SetColor command to set
// the color to all sides of the object.
//
llSetColor(v, ALL_SIDES);
//
// Now we stay in the loop if we are not at the last color yet,
// or exit the loop if we are at the last color change.
//
}
}
else
{
//
// No, it is not lit, so light it up.
//
// As mentioned before, I use a loop to cycle through the color
// change of the light source. Since this time we are lighting the
// object up, we cycle the loop from 0.0 to 1.0 in gfLtIncr
// increments. Same methdology applies here.
// for (l = 0.0; l <= 1.0; l = l + gfLtIncr) { v.x = l; // v.y = l; // Same as before v.z = l; // llSetColor(v, ALL_SIDES); // Same here too. } } } // // End of gmSetColor //============================================ //============================================ // Default State // // This is the state that is automatically bootstrapped when the object // is first created/rez'd, or the world or environment resets. // default { // // state_entry() is the first method executed when the state it resides // in is run. So State A, B, and C all can have state_entry methods, // and if they do, they are run when their respective states are called // and or executed. // state_entry() { // // First, initialize the global fields. // gmInitFields(); // // Now set the object to it's default color state. // gmSetColor(); } touch_start(integer total_number) { // // The light has been touched. Now we can switch the state of the // light to what it is supposed to be. // // Since we are using this interger gfLtOn as a boolean, the // operation of reversing the state of the light from on to off to // on again can be done with a very simple application of the // boolean operator ! (not). While I normally like to code the // long way (the gmSetColor method could have been written more // efficiently), this is one place I like to take the shortcut. // gfLtOn = !gfLtOn; // // Now set the color of the light source. // gmSetColor(); } } Save the Script and let it compile. Wabam! Now you have a nifty light. Click it to see it come on and again and it turns dark. Next post we will Texture and add Fish Emitters and Plants.

Thursday, September 20, 2007

Slim Tank

Now, who doesn’t want an aquarium in their house?
Now who doesn’t want to pay for an aquarium in their house?
Who can’t afford to pay for one? *points to self* :D
So I made one.

This is called Slim Aquarium, because its slim….:D But! You can make it any shape, size, fishy, planty, and rocky as you want. I’m just giving you a few tools to go swim with the fishes. :D

This bad boy has 3 types of fish in it, that pop up randomly, a light at the top that you can turn off and on. We can either have a water sound effect or not…after a while that gets on my nerves so I remove it. (Maybe some bubble effects later).


First off we want to drop a cylinder with on the ground and do Shift X to orient it in one spot.

On the cylinder we want to do this. Go to the Object Tab and change this: Size (meters):

X 0.850
Y 0.880
Z 0.222
It ends up being a smallish disk. This is the base of the aquarium.

Now do the copy with the arrows trick and pull up on the blue arrow holding the Shift Key to make 3 more cylinders. You now have 4 of them all stacked in a nice row. The bottom disk is #1 and the next up is #2 and I bet you guess what the others are.


So on disk 2 lets change it a bit
Size (meters):
X 0.850
Y 0.850
Z 2.222

Hollow 95
(Later we will add a script to this)

Now we have a little longer disk. This is the glass portion of the aquarium.
(Hey, it looks like a hunk of wood!) Lets do some more on this.

Click the Texture Tab and change the Transparency to 80%

Search in your Inventory for “water” Second Life gives you some default textures and one of them is water. Tada! Slide that texture on the *glass* of the tank. Both inside the cylinder and outside as well as on the very top edge and bottom edge.

On to disk *counts on fingers* 3!
Size (meters)
X 0.850
Y 0.850
Z 0.088
A slightly thinner version of disk 1. This is our light of the aquarium.
(Later we will ad a script to this).
Disk 4 is just a copy of disk 1 so nothing needs to be done to it.
Easy enough hey?

That all there is to making the Tank portion of the aquarium, next we will add some fish, the scripts to make it more alive and other effects to make it a little pretty.

Monday, September 10, 2007

Tribute To Cash

This is the latest mess I've made. "Tribute to Cash"

The co-owner of the club asked me to make this for a guy that hangs out there all the time.

I’m not sure the details on him (the guy, the co-owner I know), I was just asked to make a Snoopy rocking out… well I tried.

As for the club, (InCircle) its hard rock – if you are into that sort of music go check it out and tell them Jacks says *Heddoo*. With a butt load of DJs practically 24/7.

While you rock out there are some shops there to visit. Soon as I can, there will be an SL link to the place.